Welcome to the most comprehensive guide on “cutting by layers in silhouette studio: step-by-step tutorial”. Dive into this world of crafting, and trust me, it’s going to be a smooth ride. Let’s peel back those layers (pun intended)!
The Basics of Silhouette Studio Layers

You might wonder, “Why layers? Isn’t crafting complicated enough?” Think of layers like a cake. Sure, you could have just one flavor, but isn’t it much better when there’s a surprise filling in the middle? Just like a layered cake, working with layers gives you versatility, precision, and a professional touch.
Layers in Silhouette Studio allow you to separate designs. This way, you can edit, move, and especially cut different parts without affecting the whole design. A vital tool when dealing with intricate designs or when using various colors of vinyl.
While it might seem intimidating at first, fear not! The process is easier than you might think, and the result? Totally worth it. So let’s roll up those sleeves and get layering!
Step-by-Step: Cutting by Layers

If you’re reading this, I presume you’re ready to slice and dice… well, virtually. Grab that virtual craft knife, and let’s get to work!
1. Setting Up Your Design
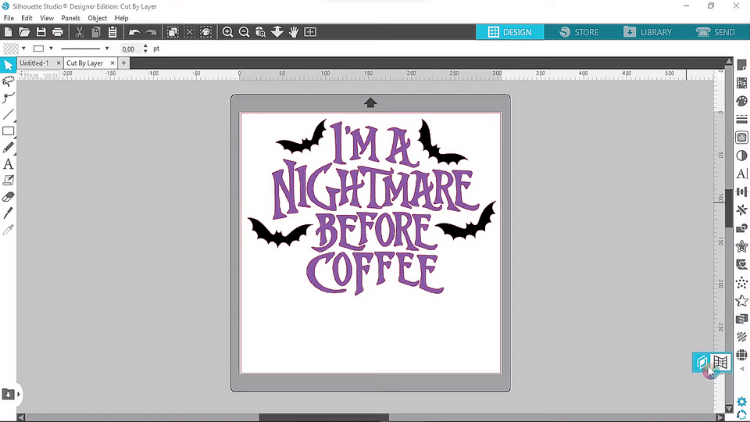
First, ensure your design is in the Silhouette Studio workspace. If you’re importing a design, go to File > Open, and select your desired file.
You can easily identify the different layers by colors. For our example, let’s say we have a flower with green leaves and a red petal. Each color can be a separate layer, allowing you to cut the leaves and the petal independently.
While setting up your design, it’s a good idea to zoom in to ensure every detail is crisp. It’s like looking closely at a painting; you get to appreciate the finer strokes.
2. Separating the Design into Layers
Select the portion of your design you wish to assign to a particular layer. Let’s start with the green leaves. Right-click and choose ‘Send to Layer’. You can then opt for an existing layer or create a new one. Label this layer ‘Leaves’.
Repeat the process for the red petal, creating and naming a new layer as ‘Petal’. Just remember to name your layers descriptively. It’s like naming a pet; it helps in identifying them quickly!
3. Cutting the First Layer
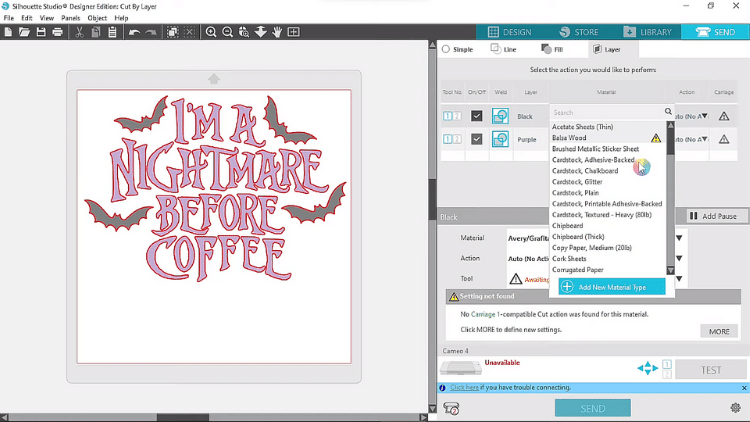
Hide all layers except the one you’re ready to cut. In our case, let’s start with the ‘Leaves’. Click on the cut settings icon (it looks like a tiny blade). Adjust the settings based on the material you are cutting. Ensure the “Cut” option is selected for the layer in view.
Load your material, in this instance, green vinyl for the leaves, into the Silhouette machine. Once set, click on ‘Send to Silhouette’ and watch the magic happen. It’s like sending your artwork off to a spa; it returns looking sharper!
4. Cutting the Next Layer
Unhide the ‘Petal’ layer and hide the ‘Leaves’. Repeat the cutting process, adjusting the blade settings for the material (red vinyl for our petal).
Now, if you were a knight, you’d be juggling between shields and swords. But here, you’re switching between vinyl colors. Quite the modern-day crafting knight, aren’t you?
Tips and Tricks!
Note: Always ensure the blade is sharp and clean. A sharp blade ensures clean cuts, while a clean blade ensures consistent cuts. It’s like a chef keeping their knives sharp; the end result is just better!
Pro-tip: Test cuts are your friend. Before committing to a full design cut, do a small test cut to ensure your settings are perfect. Think of it as a taste-test, but for crafting.
Let’s Wrap It Up… With a Personal Touch
By now, I hope you’re feeling like a Silhouette Studio layering pro. But remember, every pro was once a beginner. The key is patience, practice, and a dash of creativity. The next time someone compliments your intricate designs, you can modestly (or not-so-modestly) mention how you mastered cutting by layers in Silhouette Studio. And if they’re curious about how, well, you know where to point them!


 No products in the cart.