How to curve text in Cricut is a common mystery that most beginner crafters wonder about. You may believe that curving the text may be pointless for now but eventually, you would like to learn how to curve text in Cricut to add some flexibility to your design.
Without a doubt, curving words provide depth to every design and you can create fantastic visuals. This is why we wanted to prepare this quick guide, that will teach you how to achieve your goal in Cricut Design Space.
The good news about the how to curve words on Cricut guide is it is quite straightforward. All you need to do is follow our steps one by one and then you will be able to make your own curved letters, texts, or sentences, however, you want.
How to Curve Text in Cricut Design Space?
Let’s directly jump into the how to curve text in Cricut guide we have prepared for you. However, before going into detail, we recommend you open your software now and follow the following steps together with our guide.
In this way, you can easily learn how you are going to curve text in Cricut Design Space and remember it easily in the future. This is the most beneficial learning method, i.e., following a guide while practicing the steps.
In case you do not have access to your software right now, have no worries. You can still read our guide, or you can simply bookmark this guide to read it later. Also, if you are looking for image or text to work on, you can download it from any one of our categories right now.
Besides offering premium designs, we also offer free designs for our visitors. Any of these designs will do the work for you while following our guide.
Step 1: Upload Your Font to Design Space
If you wonder how to curve text in Cricut for designs, which you are going to create on your own, then you need to upload your font into the software. This is a totally separate topic but we have provided a detailed guide for you in this respect as well. You can click this link to check the relevant guide.
It is worth reminding that it is not necessary to upload your own font to follow this guide. Anyone who wonders about how do you curve text in Cricut can follow our guide with any text image they like.
As we previously mentioned, you can simply visit one of our category pages and download any of the designs you like. Just make sure that the design includes text so that you can follow our guide easily.
Step 2: Create a New Project
Of course, the first thing you need to do next to learn more about how to curve text in Cricut is to create a new project that you can work on. Whether you are going to upload your own design or work on a completely new project, you have to create a new project. Later, you can import the uploaded image to this project or simply keep working on it.
On this new project, we will teach you how to curve font on Cricut with three more additional steps we shared in the following. The total process will take about one or two minutes at most. So, if you have created a new project, let’s proceed to the next step.
Step 3: Use Text Tool to Create a Text

This is the last step to proceed to the magical step in our how to curve text in Cricut guide. Once you are done with the previous steps, it is time to create the text, which can be a word or sentence to work on and curve.
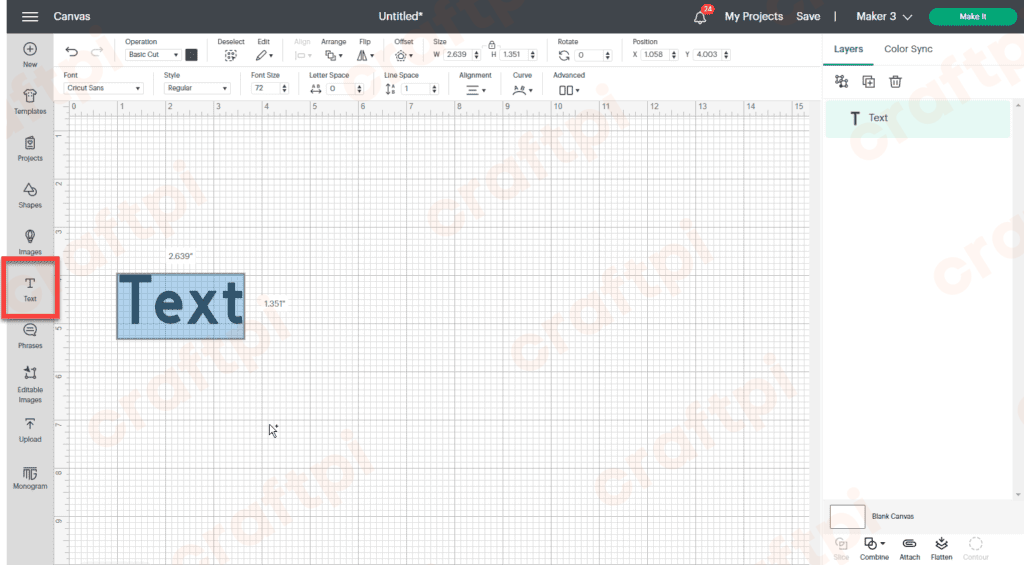
On the left bar of your Cricut Design Space, you are going to find the Text tool. Click on its icon and type anything you like to keep following our how to curve text in Design Space guide. You can write anything you like. If you have your own design to work on, you can skip this step as well.
Step 4: Use Curve Tool to Curve Letters & Words

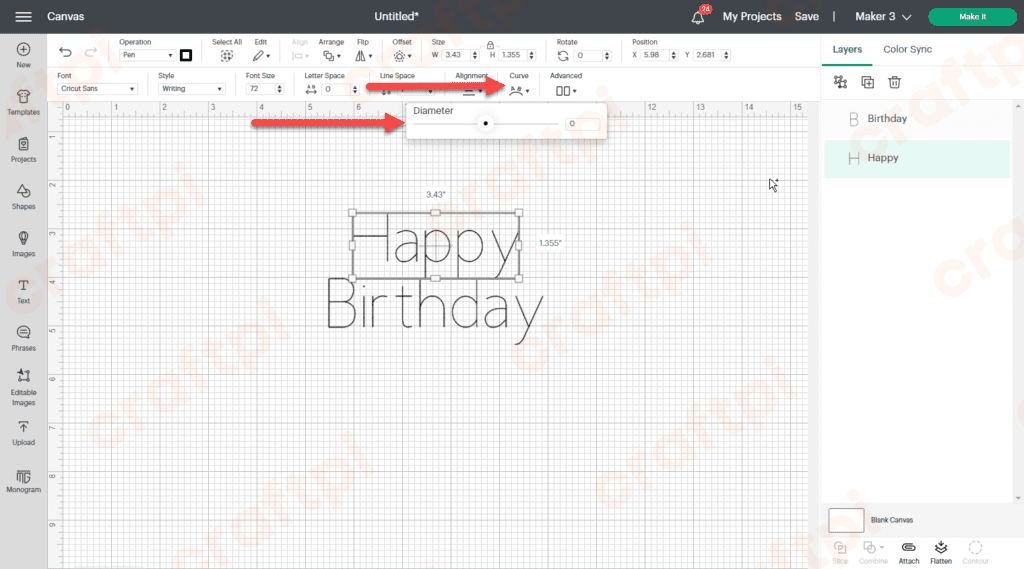
Here is the magical step in how to curve text in Cricut guide. After you typed your text, now all you need to do is click on the curve tool to access its settings. Make sure that your text is selected so that the curve tool icon will be activated.
You can find the curve tool at the top bar, which is located on the same row as the font feature. It is located towards the end, right before the Advanced section. Once you click on this icon, you will be able to curve text Cricut by choosing the diameter as you wish.
Step 5: Arrange the Curve Value
Using the diameter of the curve tool is the tricky part of the how to curve text in Cricut guide. This is the function where you are going to create your magic. Depending on your usage purpose, you can choose between different diameters to add curviness to the text you have selected.
There is no magic formula that perfectly fits all designs. This is why we recommend experimenting with this value. The good thing is you can directly see the results in your text. Keep in mind that you can also type a value on the box located on the right section of the panel.
How to Curve Letter Separately on Cricut Design Space?
Now you know how to curve text in Cricut. This method works for all kinds of texts, which can also include numbers. If you are wondering how to curve the letters separately, then you need to work on the design a bit more.
You have to follow the same method we have provided in the how to curve text in Cricut guide. However, this time, you will have to treat each letter as individual text to achieve the desired outcome. As you can see, the process is fairly simple compared to other Cricut Design Space operations. Have fun with the new feature you have learned!


 No products in the cart.